Introduction
The EnSURE Touch can be programmed with locations, plans, samples, and users. This allows users to organize test points and track the results recorded by a user. Adding individual plans, locations, or users in SureTrend Cloud is easy but can be time consuming when adding large quantities of data. SureTrend Cloud offers an import feature that allows users to quickly upload a template to add programming information to their EnSURE Touch. This article will walk you through the process of importing plans, locations, samples, and users to your SureTrend Cloud account.
Overview
- Importing Plans and Locations for ATP Testing
- Importing Samples for Microorganism Testing
- Importing Instrument Operators
- Importing Samples for Allergen Testing
Importing Plans and Locations for ATP Testing
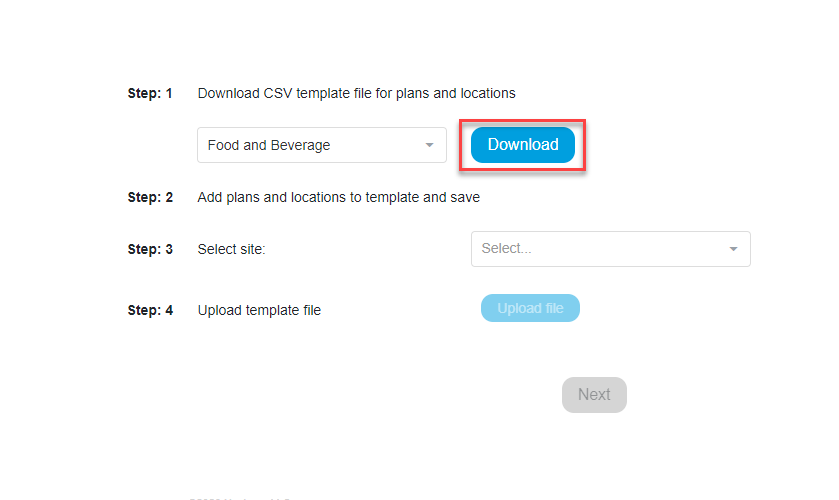
Navigate to the Import Page and Download the Plans and Locations Template
- Log in to SureTrend Cloud.
- Click the Import button.
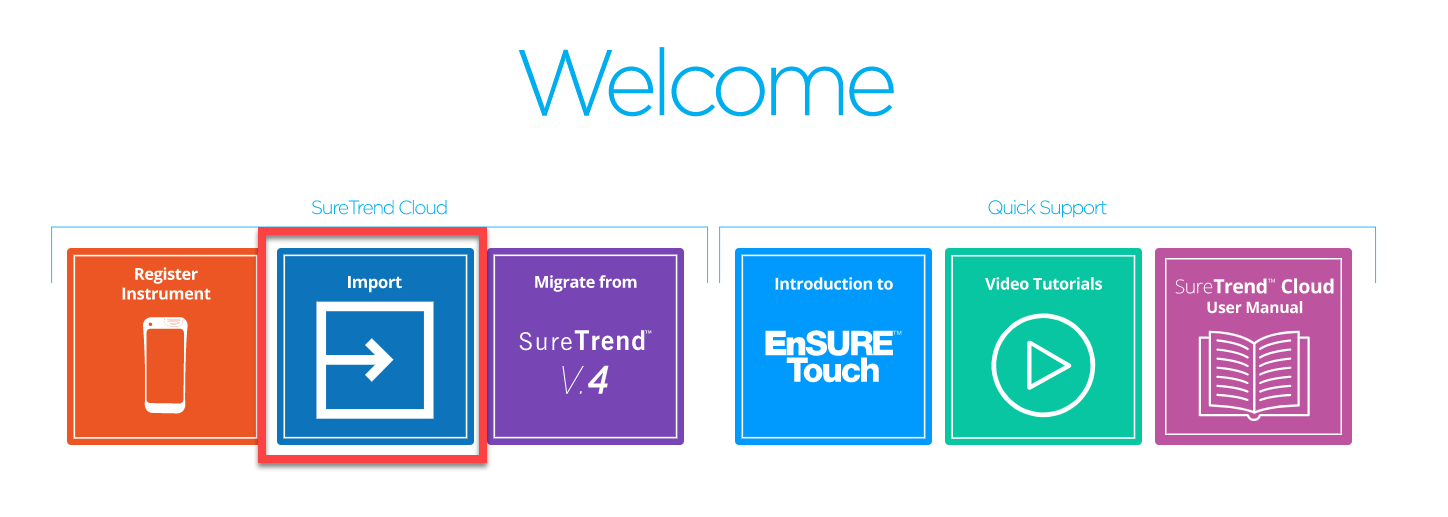
- Click Import Plans and Locations.
- Click the Download button.
Adding Locations and Plans to the Template
Required Fields
- Plan Name: A grouping of your testing points by department, line, room etc. Each location will be assigned to the plan listed in the Plan Name field. This field is optional and locations without a plan will not be assigned to any plan.
- Location Name: The name of the test point or item/object that is to be swabbed. Duplicate locations names will not be imported, but the duplicate locations will be assigned to their associated plan.
- Lower: The lower RLU limit required to pass a test.
- Upper: The upper RLU limit required to fail a test.
Optional Fields
- Plan Name: A grouping of your testing points by department, line, room etc. Each location will be assigned to the plan listed in the Plan Name field. This field is optional and locations without a plan will not be assigned to any plan.
- Device Name: The name of the test device designated for the specified location (i.e. UltraSnap, SuperSnap, AquaSnap). Any field left blank will be set to UltraSnap after importing.
Additional Fields
All additional Fields can be turned on so they show while running the test.
- Group: Used to categorize locations.
- Surface: The type of material at the location being swabbed (i.e. stainless steel, rubber, plastic).
- Zone*: An integer between 1 and 4 that describes the proximity to product.
1. Product contact surface (PCS)
2. Non-PCS within close proximity to PCS.
3. Non-PCS within process area but more removed from PCS
4. Non-PCS outside processing areas
*Note: Zone is only used in Food and Beverage leave blank if it doesn’t apply to your facility.
- Line: Used to categorize locations.
- Cleaner: Type of cleaning solution used.
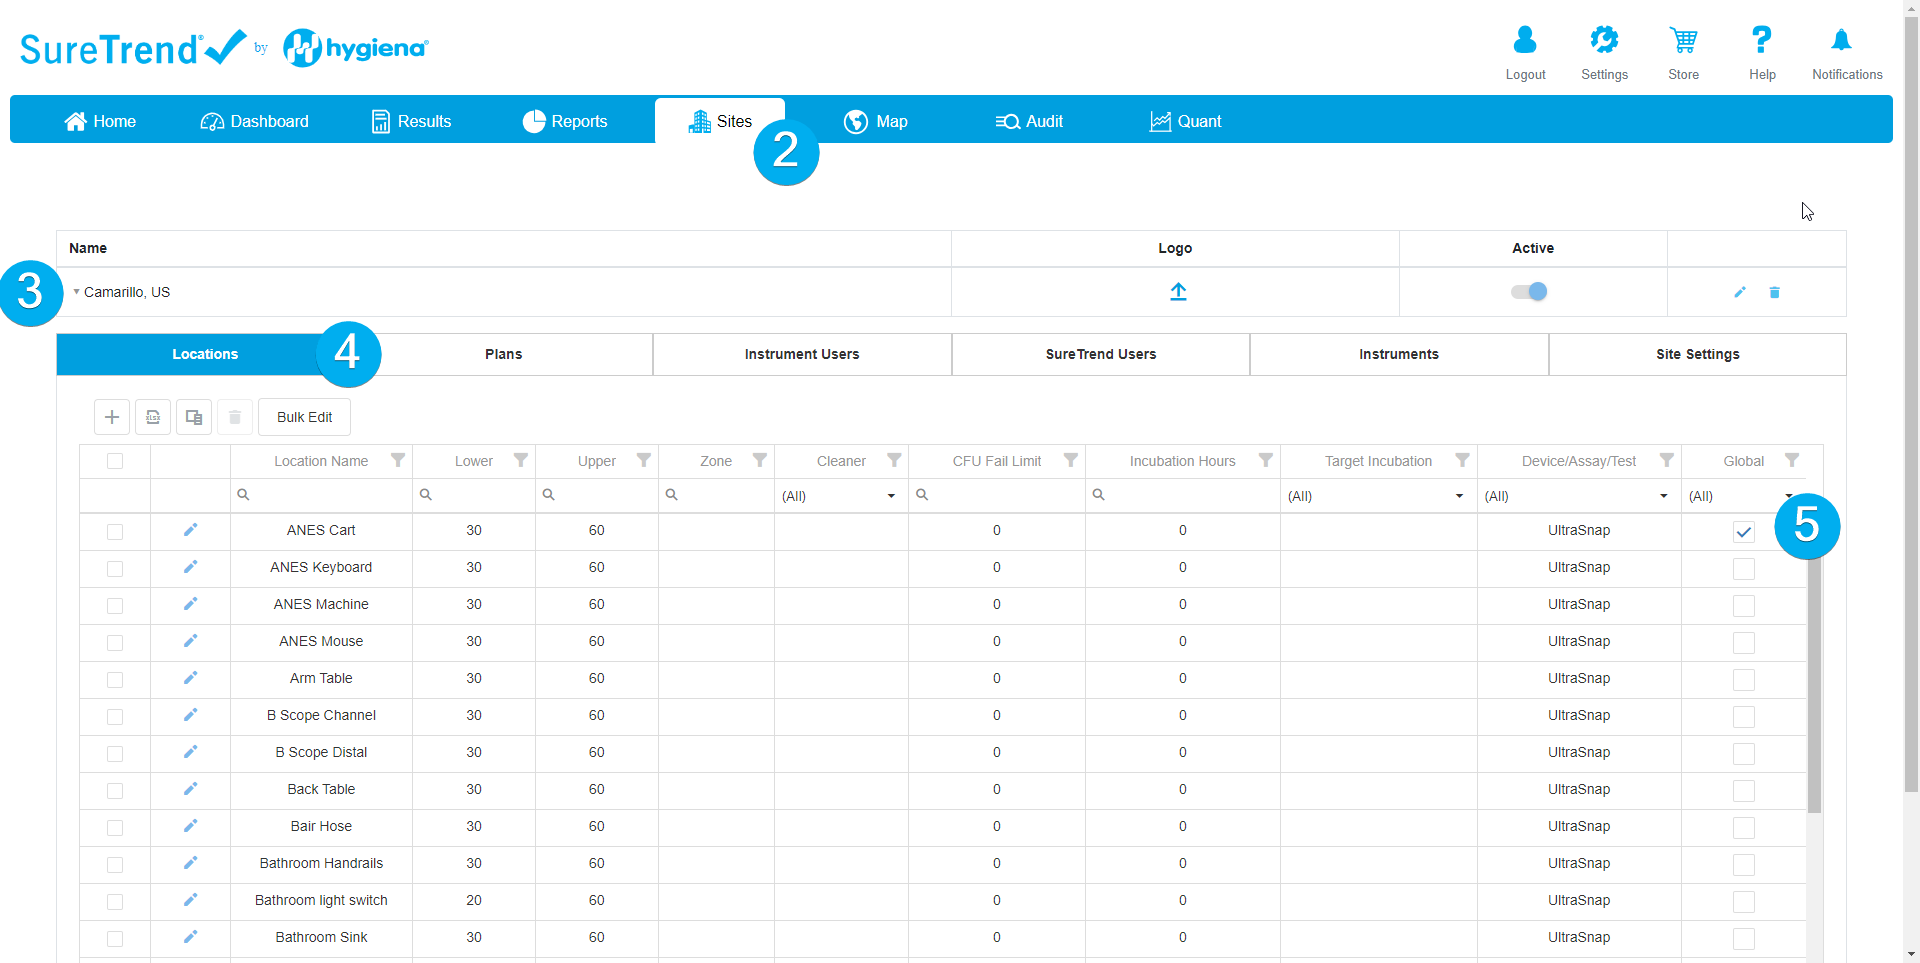
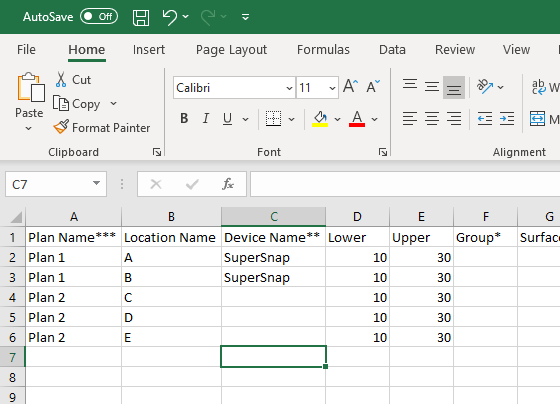
Open the downloaded template and add your location information to the spreadsheet. The required fields are Location Name, Lower, and Upper. Additional fields must be enabled under the instrument settings. In the example below, locations A and B will be added to Plan 1. Locations C, D, and E will be added to Plan 2. Locations C, D, and E will be assigned UltraSnap as the device because no Device Name is listed.
Note: Do not use commas for any of the fields. If using special characters like Ä, change the file type to CSV UTF-8 encoding when saving the file in Excel.
Uploading the Completed Template
- Return to the Import Plans and Locations page in SureTrend Cloud.
- Select a Site from the drop-down menu to add the plans and locations to.
Note: Imported plans and locations will only sync to instruments registered to the site selected. If no site selection is available, the data will be imported to the default site.
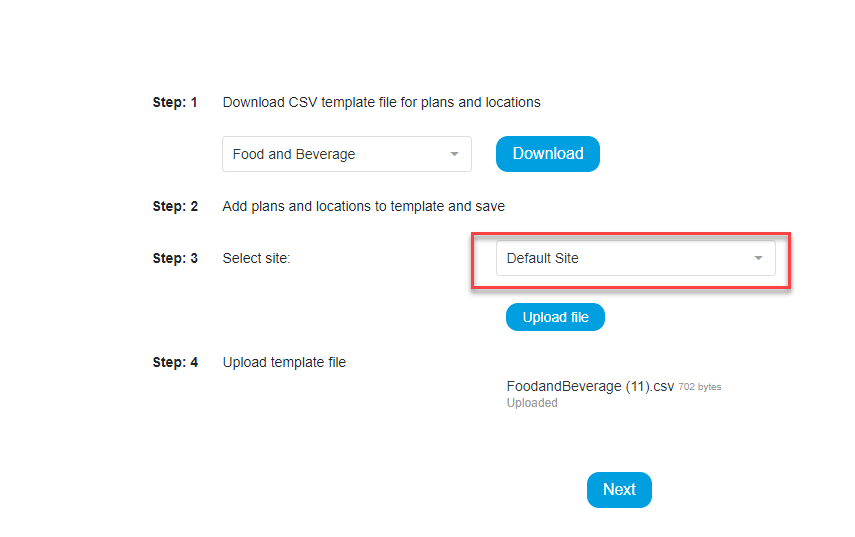
- Click the Upload File button and open the completed spreadsheet.
- Click the Next button.
- Review the status of each location. Locations with green check marks will be uploaded.
- Click Import now.
You have successfully imported locations and plans.
Importing Samples for Microorganism Testing
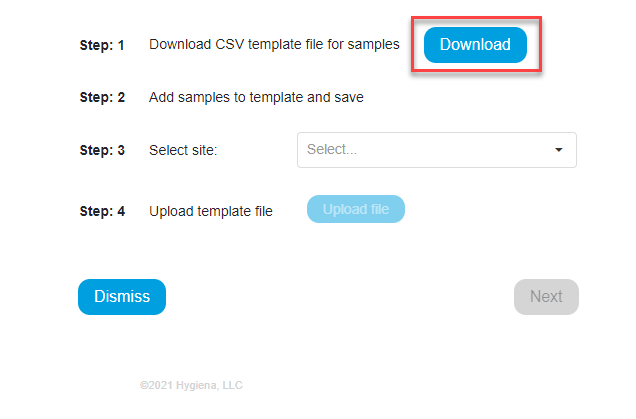
Navigate to the Import Page and Download the Samples Template
- Log in to SureTrend Cloud.
- Click the Import button.
- Click Import Samples.
- Click the Download button.
Adding Samples to the Template
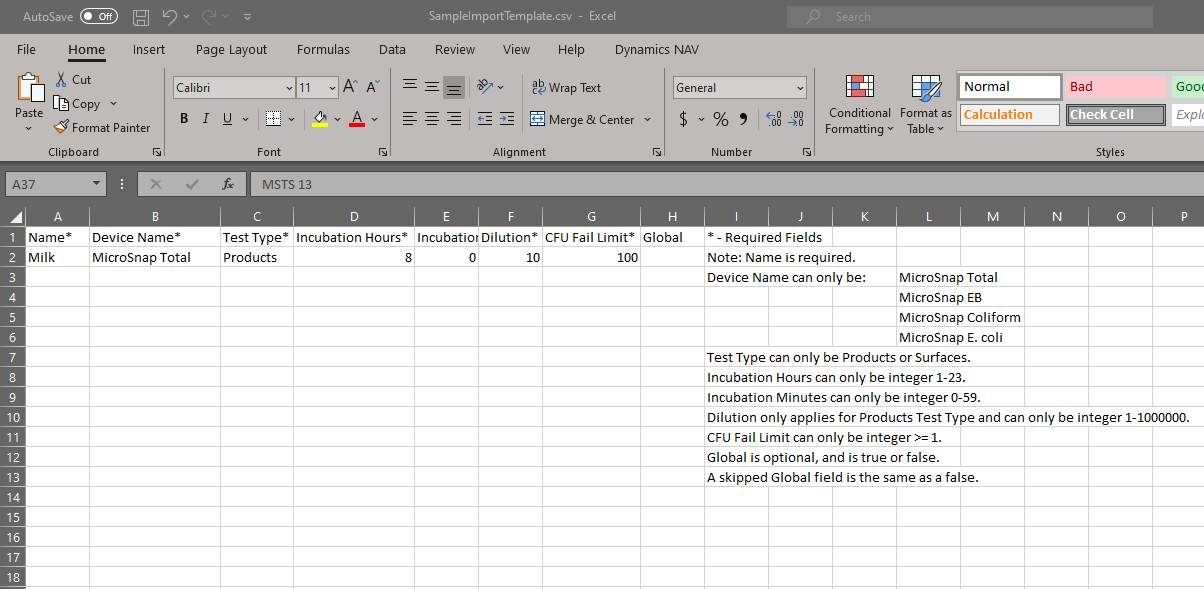
Required Fields
- Name: The name of the test point or product that is to be samples.
- Device Name: The name of the test device designated for the specified sample. This can be MicroSnap Total, MicroSnap EB, MicroSnap Coliform, or MicroSnap E. coli.
- Test Type: The type of sample being tested. This can be Products or Surfaces.
- Incubation Hours: The amount of hours the sample was incubated. This can be an number from 1-23.
- Incubation Minutes: The amount of minutes the sample was incubated. This can be an number from 0-59.
- Dilution: The dilution ratio of 1:x for the product sampled. This can be a number from 1-100,000.
- CFU Fail Limit: Any test result below the CFU fail limit will result in a pass. Any test result above the CFU fail limit will result in a failure. This can be a number greater than 1.
Additional Fields
- Global: The global field can be set to true or false. A sample with a global value of “True” will be available to instruments registered to other sites within the account. A sample with the global value of “false,” or no value, will only be available to instruments registered to the site where the template was imported.
Open the downloaded template and add your sample information to the spreadsheet.
Note: Do not use commas for any of the fields. If using special characters like Ä, change the file type to CSV UTF-8 encoding when saving the file in Excel.
Uploading the Completed Template
- Return to the Import page in SureTrend Cloud.
- Select Samples.
- Select a Site from the drop-down menu to add the samples to if required.
Note: Imported samples will only sync to instruments registered to the site selected, unless the samples have a global value of “true.” If no site selection is available, the data will be imported to the default site.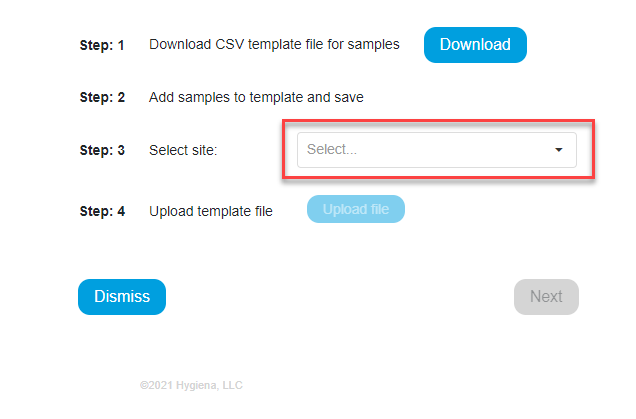
- Click the Upload File button and open the completed spreadsheet.
- Click the Next button.
- Review the status of each sample. Samples with green check marks will be imported.
- Click Import now.
You have successfully imported samples.
Importing Instrument Operators
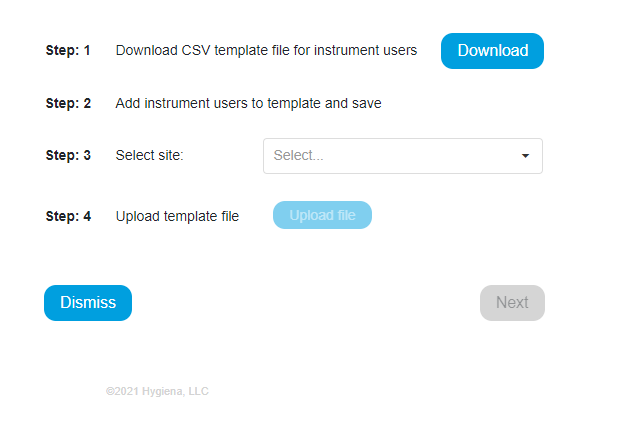
Navigate to the Import Page and Download the User Template
- Log in to SureTrend Cloud.
- Click the Import button.
- Click Import Instrument Users.
- Click the Download button.
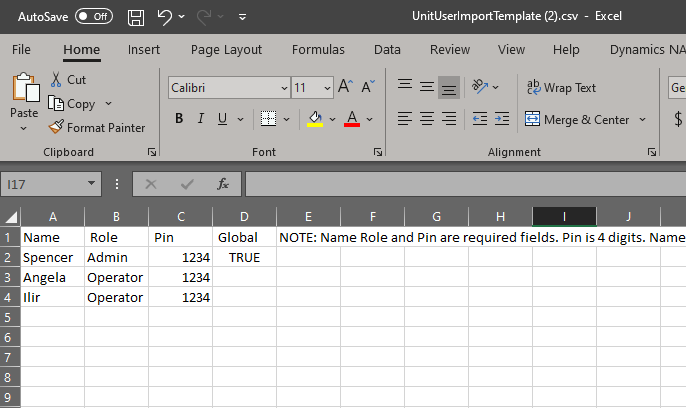
Adding Users to the Template
Required Fields
- Name: The username of the instrument operator that will be record with each result while signed into the instrument.
- Role: The two roles that can be assigned to the user are operator and admin. Operators have limited access to settings, Admins have full access to the instrument.
Note: The instrument must have at least one admin in order to enable security and require users to log in.
- PIN: A four digit code the user will need to log in to the instrument.
Optional Field
- Global: A value of “true” can be added to a user to make that user available across all sites in the account.
Open the user template in Excel and add your user information to the template. The name, role, and pin fields are required. In the example below, the user Spencer will be set up as an admin and their log in will be available on all instruments registered to the account because the value TRUE was entered into the Global field. Angela and Ilir will only be available on the instruments registered to the site where this template was uploaded.
Note: Do not use commas for any of the fields. If using special characters like Ä, change the file type to CSV UTF-8 encoding when saving the file in Excel.
Uploading the Completed User Template
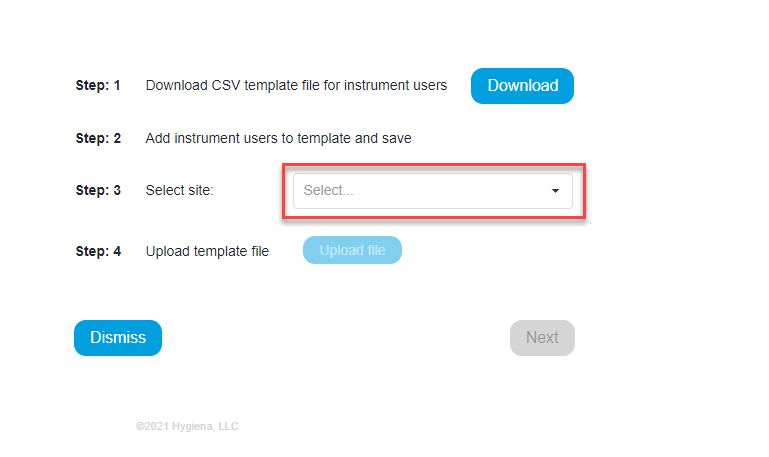
- Return to the Import Users page in SureTrend Cloud.
- Select a Site from the drop-down menu to add the users to.
Note: If the users do not have the Global attribute enabled, the imported users will only sync to instruments registered to the site selected. If no site selection is available, the data will be imported to the default site.
- Click the Upload File button and open the completed spreadsheet.
- Click the Next button.
- Review the status of each user. Users with green check marks will be uploaded.
- Click Import now.
You have successfully imported users. To enable user logins, login to your SureTrend Cloud account and proceed to Sites (select the applicable sites to you)>Site Settings> Security and click on the “Security Enabled” checkbox. Sync your EnSURE Touch registered to the Site to download the new programming information.

Importing Samples for Allergen Testing
Navigate to the Import Page and Download the Allergen Template
- Log in to SureTrend Cloud.
- Click the Import button.
- Click Import Allergen.
- Click the Download button.
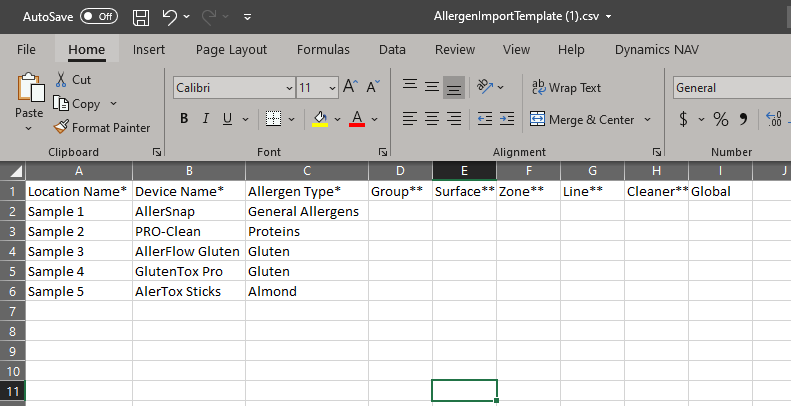
Adding Samples to the Template
Required Fields
- Location Name: The name of the test point or product that is to be samples.
- Device Name: The name of the test device designated for the specified location. This can be Allersnap, PRO-Clean, AllerFlow Gluten, GlutenTox Pro, or AlerTox Sticks.
- Allergen Type: The type of allergen being tested. See the spreadsheet for more allergen types.
Additional Fields
- Group: Used to categorize locations.
- Surface: The type of material at the location being swabbed (i.e. stainless steel, rubber, plastic).
- Zone*: An integer between 1 and 4 that describes the proximity to product.
1. Product contact surface (PCS)
2. Non-PCS within close proximity to PCS.
3. Non-PCS within process area but more removed from PCS
4. Non-PCS outside processing areas
*Note: Zone is only used in Food and Beverage leave blank if it doesn’t apply to your facility.
- Line: Used to categorize locations.
- Cleaner: Type of cleaning solution used.
- Global: The global field can be set to true or false. A sample with a global value of “True” will be available to instruments registered to other sites within the account. A sample with the global value of “false,” or no value, will only be available to instruments registered to the site where the template was imported.
Open the downloaded template and add your allergen testing information to the spreadsheet.
Note: Do not use commas for any of the fields. If using special characters like Ä, change the file type to CSV UTF-8 encoding when saving the file in Excel.
Uploading the Completed Template
- Return to the Import page in SureTrend Cloud.
- Select Import Allergens.
- Select a Site from the drop-down menu to add the samples to if required.
Note: Imported allergens will only sync to instruments registered to the site selected, unless the allergens have a global value of “true.” If no site selection is available, the data will be imported to the default site.
- Click the Upload File button and open the completed spreadsheet.
- Click the Next button.
- Review the status of each allergen. Allergens with green check marks will be imported.
- Click Import now.
You have successfully imported allergens allergen testing.
If you require additional assistance managing locations, samples, plans, or users, please contact Hygiena Technical Support by clicking here.