Chapter 8 | Microsnap™
Introduction
MicroSnap is a rapid test method for the detection and enumeration of bacteria that uses a novel bioluminogenic reaction which generates light when enzymes characteristic of viable bacteria react with substrates to produce light. MicroSnap was originally designed for use on the original EnSURE™ Monitoring System. Since then, Hygiena released a modern upgrade to EnSURE called called EnSURE Touch™ and as par¬t of our commitment to innovation we have made it possible for MicroSnap to tests to be read and quantified on the new system. The instructions below walk you through the process of using EnSURE Touch to read MicroSnap tests. The protocol for using MicroSnap (sampling, enriching, incubating, etc.) is the same for both EnSURE and EnSURE Touch™. You can find the instructions at hygiena.com/instructions.
Important Notes
- Follow the protocol for your MicroSnap test kit which is outlined in the instructions. For help designing a custom protocol for the specific needs of your matrix, please contact us.
- To get the most out of your system and to make sure your data is backed up and safe, register EnSURE Touch™ to SureTrend Cloud, and sync it regularly.
- Software updates are released regularly. They include new features, software improvements, and security enhancements. It is highly reccommended that you keep EnSURE Touch up to date so that everything is working properly and that you have access to the latest features and improvements. To check for software updates, touch the Settings Then touch the About tab on the bottom of the list and then press the blue Check for update button.
- For help using EnSURE Touch™ or SureTrend Cloud, visit hygiena.com.
Enabling MicroSnap
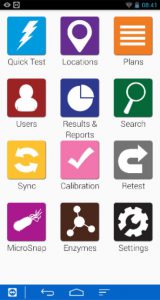
- You should see the magenta MicroSnap icon on the home screen of your EnSURE Touch™.
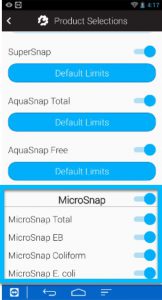
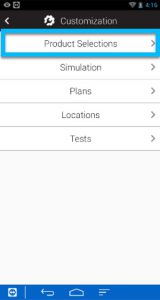
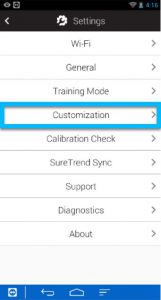
- If you don’t see it, then go to Settings > Customization > Product Selections and enable all ofthe MicroSnap products you’re interested in testing. This will activate the MicroSnap icon on the home screen.
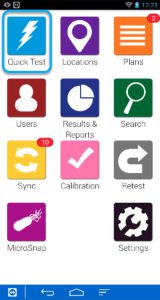
MicroSnap Main Screen
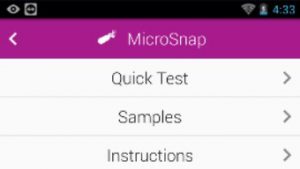
When you open MicroSnap, you will be presented with three options.
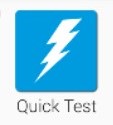
- Quick Test
a. This functions similarly to the blue Quick Test Icon on the homescreen to the EnSURE Touch™. This allows you to measure MicroSnap test without associating it to a specific sample or location. Quick Test can only be performed on surfaces. - Samples
a. This allows you to add & manage a list of Samples that you will test. In Microsnap, a sample is equivalent to an ATP location and it can refer to surfaces, products, or liquid samples. After you have added a sample you can select it and perform a test on it. - Instructions
a. This is a reminder to review and familiarize yourself with the instructions which are available at hygiena.com/instructions For security reasons, EnSURE Touch™ does not have an internet browser, so you need to access the website or another internet enabled device.

Option 1:
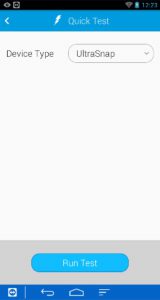
Using the MicroSnap App to Perform a Quick Test
- When you are ready to measure your MicroSnap test, open the MicroSnap app
- Select Quick Test
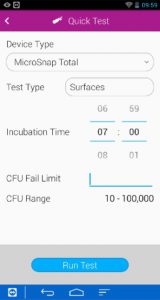
- Enter in the information for what you’re testing.
- Insert the activated MicroSnap test into the read chamber, close the lid, and touch the blue Run Test button
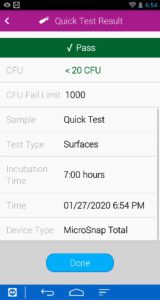
5.View Results


Option 2:
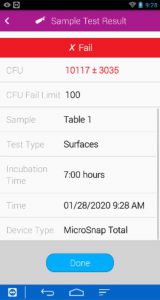
Using the Microsnap App to Perform a Sample Test
- To do this, you first need to create a sample. A sample is essentially equivalent to an ATP location – it refers to the surface or product that you’re testing
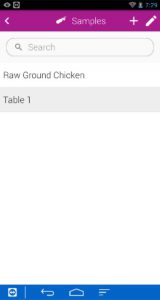
- Open Samples
- Touch +
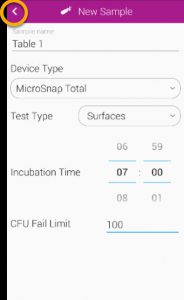
- Enter in the information for the sample you are going to test.
- Touch <. Changes are automatically saved.

6. This will return you to the main samples screen. From here you can select the sample you’d like to test.
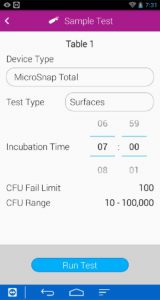
7. Confirm the information on the screen is correct and insert the activated Microsnap test device into the read chamber, close the lid, and touch the blue Run Test button.
8. View the results


Option 3:
Using the Quick Test App to Measure a MicroSnap Test
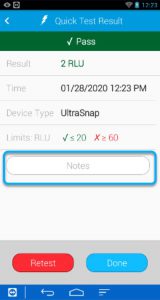
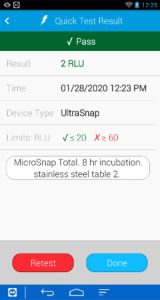
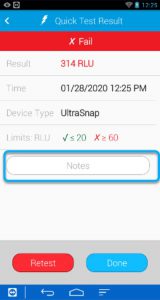
The blue Quick Test app is primarily used with ATP tests such as UltraSnap™. This option is essentially the same as when MicroSnap tests are read on the original EnSURE system because results are returned as RLU and then need to be converted to CFU using a conversion table. Measuring a MicroSnap test in Quick Test can be useful if you have a custom protocol for your matrix such as incubating less than or more than what is indicated in the MicroSnap instructions or if you have a custom RLU > CFU conversion that has been designed based on data you’ve gathered on your own or with the help of Hygiena’s R&D department. Results obtained with the blue Quick Test app will be recorded as UltraSnap results, but you can use the notes field to specify additional test information such as which MicroSnap test kit was used, how long it was incubated for, the dilution, the matrix, etc. Generally, options 1 or 2 listed in this guide are preferred.

- When you are ready to measure your MicroSnap test, open the blue Quick Test app
- Select UltraSnap as the Device Type
- Insert the activated MicroSnap test device into the read chamber, close the lid, and touch the blue Run Test
- View Results. From this screen, touch the Notes field to enter in information about the test such as MicroSnap test type, matrix/sample name, incubation time, dilution, or CFU conversion.
Common Questions
1. Why does it say, “under incubated” or “over incubated”?
a. MicroSnap has features to ensure that the instructions are followed. For example, MicroSnap Total should be incubated for 7 hours. If you enter 6 hours, it will let you know you’ve under incubated. You will still be able to run the test. If the CFU result is below your CFU fail limit at 6 hours, it will let you know that the test results are indeterminate and that you should continue to incubate until you reach 7 hours and then measure to receive the updated CFU reading. If at 6 hours of incubation the CFU already exceeds your CFU fail limit, there is no need to continue incubation – your test has failed. If you over incubate, you will receive a message indicating that the test is no longer valid and that you should incubate for the time indicated in the instructions. If you have a custom protocol designed by your lab or with the help of Hygiena you can use Option 3 of this guide or contact your Hygiena representative for help.
2. Why can’t I edit the Test Type field? I want to test a product not a surface.
a. The Quick Test functionality of MicroSnap only allows testing of surfaces. If you want to test a product, you need to use the Samples functionality outlined in Option 2 of this guide.
3. Is MicroSnap AOAC-RI validated for use with EnSURE Touch?
a. MicroSnap Total, E. coli, and Coliform have received AOAC validation for use with EnSURE, the predecessor to EnSURE Touch. The protocol for MicroSnap is the same regardless of which instrument is used to measure the test. We are in the process of applying to extend our validation for MicroSnap tests to be read using EnSURE Touch.
4. When performing a test in Samples, why can’t I change the MicroSnap test type?
a. MicroSnap test type cannot be changed in the test ready screen. This is because the CFU fail limit and dilution is specific to MicroSnap test and the matrix/sample being tested. This information is entered on the screen when you create a new Sample. If you are testing the sample matrix/sample with multiple MicroSnap test kits, you need to create them as individual samples in the Samples screen of the MicroSnap app.
5. If I have many testing locations (samples), is there a way to upload an excel spreadsheet?
a. You can use the location importer in SureTrend Cloud to upload testing locations in bulk. Currently, this is only available for ATP test, but soon you will have the ability to do it for MicroSnap tests as well.
Conclusion
Like everything on EnSURE™ Touch and SureTrend Cloud, MicroSnap functionality improvements will continue to be made. To make sure you are benefiting from the latest features and enhancements, please connect your EnSURE Touch to wifi and check for software updates regularly. Updates are released every two weeks. If you have questions or need help, please contact us.