

Introduction
In this tutorial, we will walk you through how to replace your CalCheck Battery. You may need to replace the battery if you activate the positive control often, notice the activation light turns red when pressed, or if your CalCheck rod is reading lower than the acceptable range. This tutorial will show you how to replace the CalCheck rod battery.
Steps
- Remove battery cover. There is a cover over the battery on the top side of the CalCheck (Figure 1) that you will need to gently ‘pop’ off. Be sure to remove with ease as this cover requires very little pressure to remove. Do not twist off this cover as it cuffs around the CalCheck rod and should avoid being stretched. Figure 2 shows the cover removed and the battery exposed.

- Remove & replace battery. Gently remove the current lithium coin battery and replace it with a brand new one. The battery needed is a small coin shaped CR1025 battery (see Figure 3). It is essential to utilize a well-known name brand battery as others have proven to be too weak to provide the maximum 3V or more needed to product accurate RLU readings.
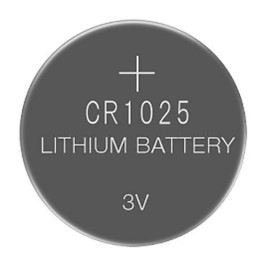
Figure 3. Examples of the CR1025 battery needed
A. Slightly pinch the internal battery terminals prior to replacing the battery to make sure there is a secure connection when inserted.
B. Be sure the battery is correctly inserted into the CalCheck, paying special attention to make sure the polarity is not reversed. Top of coin cell is the side with a +.
C. If the battery is installed incorrectly or the contacts are loose, there will be no light when rod is activated.
- Reattach battery cover. Once you have the new battery in place you will have to align the cap correctly upon reattachment. There is a notch that you will see on the inside of the cap that needs to align up towards the top of the Cal Check (See Figure 4 for clarification)
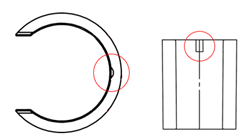
Figure 4. Look on the inside of the battery cover for a tiny notch the needs to be positioned upward to the top/button end of the CalCheck rod upon reattachment.
- Test Rod. Now that the new battery is in, and the cap is aligned properly you can test the CalCheck by pressing the top button. You can determine that the battery replacement was successful when you see the green light activate (see Figure 5) during this process.

Figure 5. Green light present when rod is activated and receiving sufficient voltage.
If you need further assistance, contact Hygiena Technical Support.
- Phone: 1-888-HYGIENA (1-888-494-4362, option 2)
- Email: techsupport@hygiena.com
- Submit a Support Ticket
- Schedule a Microsoft Teams meeting with support